2002 Mercury Grand Marquis, Blower Inop

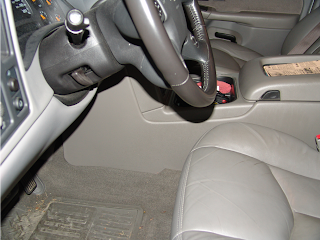
This 2002 Mercury Grand Marquis came in with a customer complaint of a blower motor that no longer worked. The customer also stated that up until this point it would work sometimes and sometimes not. This repair is also for Crown Victoria and Town Car applications. I guess I have gotten so used to this that I hardly ever test these systems anymore I just replace the blower speed controller. To test locate the blower motor at the passenger side firewall under the hood. It is just outside the left side of the picture below. Check for 12 volt power on the brown/orange wire (supplied through fuse 18, 30 amp in the interior fuse box) with the ignition on. Now check for ground on the orange/red wire. If both are present the blower motor is faulty. If no ground is present move on to the blower speed controller. It is located behind the rear of the passenger side cylinder head, under the heater hoses.

I would normally recommend doing more testing at this point but the harness is so ridiculously hard to get to, that I would rather buy a new $70.00 part and install it based on experience. If I still had a problem I would of course have to do more testing. Again based on experience, I have changed around a hundred of these things over the years to correct blower problems and have never had to go any further. With the exception that the blower motor also needs to be changed on older vehicles with a lot of miles. Of course you should have already checked that according to the above paragraph. I will sometimes do an amperage draw test on the motor if it is old or the mileage is high. A bad blower motor can damage a blower speed controller.

With the evap solenoid assembly out of the way you can kind of get to the connector and mounting bolts. The evap solenoid is easy to remove. Two hoses (fragile be careful), one vacuum hose, one harness connector and two mounting nuts. Removing the harness connector has always been a pain to me. The locking tab is located on the bottom side of the connector. By the time I have gotten my hand positioned just right to hear the latch click and release, I have no ability to actually pull the connector loose from the blower speed controller. The trick is to use a wide bladed, long screw driver between the edge of the connector and the blower speed controller. Line the blade up in the slot and twist to separate the connector once the locking tab is released. It sometimes takes several tries before God has mercy on you and allows it to come free.

Once you have unplugged the blower speed controller harness and removed the two 8 mm headed screws, you can sometimes wiggle the controller out of the car past the heater hoses. Putting it back in is a different story however. I do not know why I always feel compelled to try when most of the time I have to pull one heater hose loose. I guess because every now and then, it will come out and go back in with no problems.

The one heater hose as shown below needs to be removed from the pipe at the rear of the intake. The clamp is a little bit of a pain but not too bad.

Just a picture of the new controller be installed. I use a 8 mm swivel socket with an extension to make it much easier.

The controller is back in it’s place, the heater hose is back on the pipe and now it is time to put the clamp back in place. You can also get a clear picture of the harness connector.

It takes a little while to work the clamp back into place. Patience is indeed a virtue. After the clamp is back on it is just a matter of reconnecting the evap solenoid and topping off the coolant.

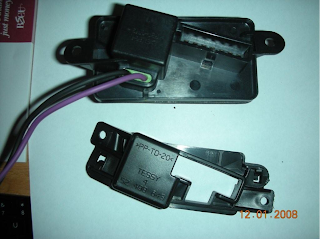
Just a picture of the new versus the old blower speed controller. This part is now available through The Electric Connection  in the  Motorcraft brand.

2000 Ford Taurus, A/C Not Cold

This 2000 Ford Taurus came in with the complaint that the compressor was coming on but the air out of the vents was not cold. In fact it was hot. I checked and the compressor indeed was coming on and the lines were quite cold so I knew the problem was with the blend air door control. The blend air door actuator is located behind the radio and climate control assembly.

There are two holes on either side of the assembly where you have to install a removal tool.

Once the tools are in place the hoops need to be pushed to the outside in order to release the locks.

Then the assembly can be slid out of the dash.

The actuator is hard to distinguish in the picture but the white circle with the square recess that is located just to the left of the orange vacuum line is the actual part that rotates the door on the opposite side of the actuator assembly.

With the controls still connected and the key on I adjusted the temperature from hot to cold and back again. The shaft would just start to turn a little and then it would stop and just tick a little bit. Sounds like a broken gear in the actuator to me. The actuator should move in about a 90 degree arc if it everything is working correctly, when adjusted from full hot to full cold.

I replaced the actuator which simply involved removing a few screws and bracket if I remember correctly. Sorry, I do not seem to be able to find the rest of the pictures right now.

2005 Ford F150, Rear Park Lights Inop

This 2005 Ford F150 Pickup came in with the complaint that the rear park lights or tail lights were not working but the front ones were. I figured simple enough probably a blown fuse from towing a trailer with a short. Well I figured wrong. After checking thoroughly I found that the lights would flicker on and off if I wiggled the harness connector at the left rear of the truck.

DSC02534

Well I guess I need to see what’s going on inside this connector. I unplugged it and nothing obvious.

I located the brown wire and checked the drag resistance of the terminal and it was very loose.

In order to have room to work I had to drop the spare tire and release the fasteners that held the connector to the frame rail.

I also had to remove some more clips that were holding the harness itself to the frame rail.

With the harness connector now in a position that I could now work with it, I removed the internal locking cover with a small hook.

With the cover removed I could now access the individual terminal locks.

I released the lock and pulled the wire from the connector.

After thorough inspection of the terminal with a magnifying glass I determined that the terminal was okay except the obvious loose condition caused by a compressed spring tab.

Using a very sharp angled pick I was able to lift the inner spring tab and correct the loose condition. I worked slowly and went back and forth from side to side in order to bring the tension back evenly. I also slid a piece of thin wire in from the opposite end of the terminal to make sure there was a good lift to the terminal tab. If I had not been able to salvage the terminal, I would have two choices. Install a new terminal or bypass the circuit around the connector with a piece of wire and a couple of splice connectors.

After being sure the terminal would be okay, I installed the terminal back into the connector and added a touch of dielectric grease to help maintain the connection integrity. My observations lead me to believe that the mechanical resistance of the female terminal had been compromised by the lack of free movement between the mating terminals. Therefore when the terminals were forced to move from harsh bumps the terminals would dig in rather than slide. When they dig in the action works against the spring resistance and the spring tension is eventually compromised.

I double checked the male terminals for arcing and found no sign. Just to be sure I cleaned them slightly with a pencil eraser. By the way an eraser is the absolute best thing to clean a terminal with if you have enough access to it. You would be surprised at the some of the things I have gathered over the years to perform little trick repairs. Maybe one day I will do a post about some.

2007 Chevrolet Silverado, Changing a Leaking Condenser

This 2007 Chevrolet Silverado Classic came in with a leaking a/c system. I installed leak detection dye and had the customer drive the vehicle for a few days as I could not pinpoint a leak with an electronic leak detector. When the truck came back in, I looked around a little with my black (UV) light and found the leak at the condenser. I could see it through the grill. Time to change a leaking condenser assembly. First I had to remove the clips that held the upper plastic trim panel in place.

With the trim panel out of the way I could easily see the leak. Even without a black light. Notice the greenish haze on the bracket.

Now, it’s grill removal time. Pretty easy, it just unsnaps. In most of the retention spots a screwdriver can be used to pry it apart. The one shown in the picture below is a lower retainer.

Around the lights however I prefer using my fingers so I do not damage the lights.

Better views of the clip removal.

Now, that the grill is out of the way the truck looks a whole lot different and you can clearly see the dirt build up and the wet look to the upper left corner of the condenser as viewed in the following picture.

The next step is to remove the passenger side light assemblies. Rotate the lever up.

Slide the pin out.

< Tilt the light forward to expose the wiring.

Disconnect the headlight wiring connectors.

Release the clip holding the marker/DRL assembly in place.

Remove the sockets from the light assembly.

Remove the bolts from the bracket that hold the light assemblies to the truck.

Release the clips from the rear of the bracket and pull the bracket from the truck. Remember where the wires feed through the bracket.

Now we are getting close to getting the condenser out. Remove the bracket screws and disconnect the a/c lines. I had already evacuated the system.

With every thing now out of the way the condenser can now be slid out.

Take your time as you do not want to knock the paint off of the fender.

Install the new condenser by sliding it back into place and install new gaskets at the line fittings.

Vacuum the system and recharge. Remember to add refrigerant oil to compensate for the loss both from the leak and the removal of the old condenser that was actually holding oil.

You may notice that the accumulator tank was not changed. I strongly recommended to the customer and to you to replace the accumulator (drier) while performing and major service. Especially when there has been an ongoing leak. The customer declined.

2003 Chevrolet Silverado, Daytime Running Lights Inop

This 2003 Chevrolet Silverado came in with both daytime running lights inoperative. In order to access the DRL bulbs the headlight assembly has to be removed first. It is pretty simple. Locate the retaining pin and lift up the lever.

With the lever lifted up the pin can be slid out towards the center of the grill.

Now that the pin is removed the headlight assembly can be tilted forward.

Once the assembly is far enough out the wires can be disconnected from the bulbs.

All right now the headlight assembly is out of the way you can access the DRL socket from the rear of the lower light assembly. However it is pretty easy most of the time to just depress the latch at the outer edge of the light assembly.

I am using a screw driver to depress the latch and then the assembly will come out quite easily.

I removed the socket from the lens assembly with the intention of just replacing the bulb but I found that the socket was damaged, burnt out.

I spliced in a new 4184 socket assembly. Installed a new bulb, placed the socket back into the light assembly and reassembled the truck. Another one fixed.

To order this socket please click here.

You have let me realize that I did not put enough information on actually splicing in the new socket. There has been some confusion so I have added another post on that subject.
Click here to see.

1991 Subaru Loyale, Blows Fuse For Taillights, Parklights

This 1991 Subaru Loyale came in with the complaint that the taillight fuse would blow. It had been in before and no short was present while it was in the shop but this time it was finally there. I removed the exterior lights and inspected the wiring and found absolutely nothing. So I turned my attention to the interior of the car.

I removed the lower dash and steering column covers and found a lot of wiring that was just hanging around.

I also found the short.

It seems that someone had replaced the computer in the car with a used part (which is okay) but when the used computer was mounted in place not enough care was taken to ensure the wiring was clear and the wire in the picture above was pinched between the computer and the mounting bracket.

Pretty simple repair once I found it. Just cut out the damaged section, installed a splicing connector and heat shrink tubing.

I then took my time and made absolutely sure that the wiring was clear when I installed the computer back to it’s mounting position.

2004 Cadillac CTS Power Window Inop, Fell Down

This 2004 Cadillac CTS came in with the complaint that the driver’s window is down and will not go back up and stay there. The owner said she heard a pop and the window went down. Sounds like the power window regulator broke.

I started by removing the manual door lock button. With the button pulled all of the way up you can see the locking tab in the center that has to be pulled out as shown below.

With the tab pulled out it slides off of the actuator threaded rod.

Next there is a trim cover behind the pull handle that has to be removed.

Now that the trim panel is removed the phillips headed screws can be removed. The power window switch can be lifted up and unhooked as well.

The trim panel around the interior door handle unsnaps and pulls off.

With the screws and trim pieces removed the door panel can now be snapped off. You can see the gray retaining clips around the perimeter of the door panel as viewed from the inside of the panel. The wires for the speaker also had to be removed.

The lower anchor plate has to be removed.

Now the vapor barrier can be carefully pulled back without damaging it (needs to be in place and is a pain top make a new one).

Now, this is where the job goes a little sour for me. The customer could not afford to replace the power window regulator and wanted it jambed in place. After removing the broken pieces and looking over the situation I decided to go with the following approach. An inexpensive pair of locking pliers (about $6.00) clamped the slide assembly to the main travel bar. I did not want the release on the locking pliers to move and allow the pliers to become unlocked so I installed a hose clamp around the locking mechanism to clamp it together. It worked quite well on this pair of pliers but it could be a different set up and another pair.

Even though I hated doing this kind of repair ( I like actually fixing things) the customer was quite happy and given the economic situation I thought it worked out pretty good overall.

Identifying The Correct Blower Resistor for Your 1999 – 2007 Chevrolet or GMC Truck Or SUV

In an attempt to avoid any further confusion I am giving some detailed information on the blower resistors for the Chevrolet Avalanche, Silverado, Tahoe and Suburban, GMC Denali, Sierra, Suburban and Yukon and Cadillac Escalade and midsized Buick Rainier, Chevrolet Trailblazer and SSR (2004+2005), GMC Envoy, Isuzu Ascender and Olsmobile Bravada.

First of all the 15-81772 (formerly the 15-81095) resistor and resistor combo only fit Chevrolet Trailblazers and 2004+2005 SSR, GMC Envoys, Isuzu Acsender and Oldsmobile Bravada with manual a/c controls. The vehicles with auto a/c controls use a blower speed controller that only has three wires in the female connector on the unit.  To see diagnostic and repair information on  a blower speed controller please click here.

An interior view of a 15-81772.

An exterior view of the 15-81772.

The 15-81772 resistor for Trailblazers and Envoys with 4180 Repair Harness Combo.

The full sized Chevrolet, GMC and Cadillac trucks and SUV’s with manual a/c controls use one of two resistors. The 15-81086 is the most popular by far but a few vehicle details are important. RPO Code CJ3 or C42 ( manual a/c controls) and without RPO D07 ( Factory Floor Mounted Center Console). It is also important to note that a few vehicles do not go by these codes and therefore we strongly recommend a visual inspection of your part. The 15-81086 has a total of four mounting holes in the end tabs. The original design may have used a two part assembly.

The interior view of the 15-81086 resistor.

The exterior view of the 15-81086 resistor.

The full sized Chevrolet, GMC and Cadillac truck Blower resistor and repair harness combo with the 15-81086 resistor.

The 15-81087 resistor is used in full sized trucks and SUV’s with RPO Codes CJ3 (manual a/c controls) and with RPO Code D07 (Factory Floor Mounted Center Console). Again there are a few vehicles that this is not accurate on and a visual inspection is recommended. The 15-81087 is distinguished by only having a total of two mounting holes, one in each of the two end tabs as shown in the following pictures.

The interior view of the 15-81087 resistor.

The exterior view of the 15-81087.

The full sized Chevrolet, GMC and Cadillac truck Blower resistor and repair harness combo with 15-81087 resistor.

When ordering be sure to leave as much information as possible about your vehicle in the customer comment box at check out.

1993 Ford Explorer, Battery Goes Dead

This 1993 Ford Explorer came in with the complaint that the battery goes dead and both the battery and the alternator have been replaced. Believe it or not this is how it came in. I wonder what could be the problem? Maybe some faulty cable connections? Well this is strange the battery terminal on the left side of the picture is for the battery ground and it has two gray fusible links attached!

The positive cables look a little flaky as well.

Yep, those fusible links that are attached to the negative battery terminal are connected to a large black wire with an orange stripe. Isn’t that the color code for the alternator battery lead? I think this is the problem. Time to clean this mess up.

About an hour or two later and it’s looking pretty good even if I do say so myself. The alternator charges correctly now and there are no drains on the system. Stick a fork in this one because I believe it is done!!!

1999 Ford F150, P0455, Gross Evap Leak

This 1999 Ford F150 came in with the SES light on and a code P0455 stored for a gross evap leak. I checked the obvious things like a loose or missing gas cap, okay. I also inspected the evap hoses and found no problems. I did a little bit of reading and found that I needed to check the vacuum source for the Evap Canister Purge Solenoid located at the left rear of the engine compartment and the pressure sensor at the rear of the tank. As luck would have it I found the problem at the vacuum line for the solenoid. It was stuck to the lower side of the EGR valve.

I pulled the vacuum line off of where it had melted to the EGR valve.

Cut out the damaged section and installed some thick walled 7/64″ rubber vacuum hose over the two cut ends.

The white piece in the picture below is the original vacuum line and the black hose to the left is part of the new rubber hose.

I talked with the customer about the repair and we concluded that he had probably moved the hose when he did a “tune up” and just did not notice it. These things happen.