This 2011 Chevrolet Malibu came in with the complaint that both low beam headlights do not work.
Since the bulbs are not easy to access testing begins at the underhood fuse box. Fuse number 7 is for the left low beam and fuse number 9 is for the right low beam headlight. The fuses need to be checked with the lights turned on. If the fuses are good and properly powered the problem is likely blown bulbs. At least it is between the fuse box, the bulbs and the bulb grounds. All of the interior switches, relays, wiring and computers are eliminated as possible causes.
The first step in getting to the headlight bulbs is to remove the top filler panel by removing the push pin retainers and screws.
There are four push pins and ten screws.
Next remove the front fender inner liner screws and push pin retainers.There are quite a few as shown in the following pictures.
The lower front splash shield also needs to be removed.
From inside the wheel well remove the front fascia bolt as shown below. There is another bolt a few inches forward of this visible bolt that needs to be loosened. It does not have to be fully removed. The plastic wheel well liner will have to be bent backwards to gain access. Full removal of the liner makes this easier but also takes more time.
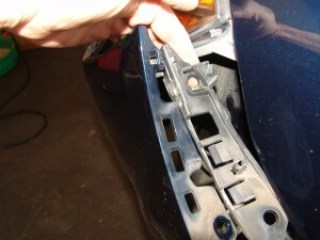
Carefully pull the fascia loose from the fender. In the picture below you will see that I went to the trouble of working inside the wheel well to remove the bolts that hold the attaching bracket to the front edge of the fender. This step is not needed but it did allow me the chance to better show you how the fascia is attached to the fender retaining clip.
In the next picture you can see how the latching fingers and tabs line up and secure together. Hopefully this will make it easier for you to see how the detach the fascia without any damage to the paint, fender or fascia.
With the side of the fascia pulled loose the side attaching screw for the headlight assembly can be removed.
The upper edge of the fascia is attached to the fender in the same manner as the side. You will need to pull up on the fascia while wiggling and slightly flexing the fascia to release the clips.
Once the upper edge is free it can be pulled back slightly to expose the inner headlight assembly attaching screw. Maneuver the light assembly around to free it from the car far enough to access the rear of the assembly. Now the bulb can be removed with a twist. The bulbs were indeed blown and replacing them was all that was needed to fix this problem but that was enough.
When installing the fascia line up all of the edges and pop the panel back into the retaining clips. To first and then the sides.


